|
|
Post by Paul B on Feb 9, 2020 13:49:03 GMT
I gotta get one of these  . And a bent brush too  . |
|
|
|
Post by Boots on Feb 9, 2020 15:03:00 GMT
Already got my bent brush  |
|
|
|
Post by Snipersmudge on Feb 9, 2020 15:51:42 GMT
Very neat idea re the gluing and a nice bit of colour on it too  |
|
|
|
Post by PorcoRosso on Feb 10, 2020 14:49:14 GMT
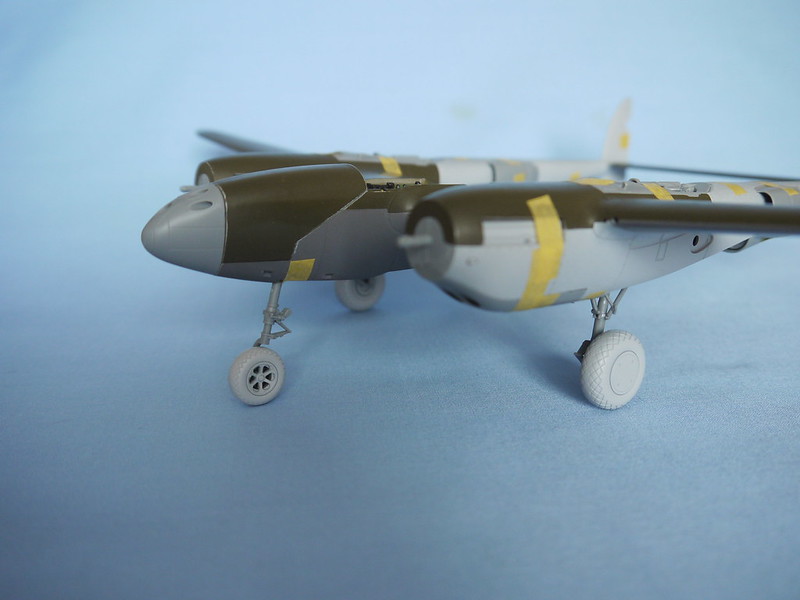
Cheers for your posts Boots, Armorguy, Paul, and Pete. Much appreciated.  I've taken a couple more photos. One showing the main sections taped together (again), this time with the wing tips and ailerons glued in place. The turbochargers have been test fitted, painting them will be the next stage. The second shows the wing root after it was glued together. 
 |
|
|
|
Post by Armorguy on Feb 10, 2020 16:09:42 GMT
This build is superb to follow. The office's green looks outstanding !
|
|
|
|
Post by PorcoRosso on Feb 10, 2020 17:06:49 GMT
This build is superb to follow. The office's green looks outstanding ! Thank you Armorguy, that's much appreciated. The green is Vallejo Air green zinc 71.094. |
|
|
|
Post by Boots on Feb 10, 2020 18:24:55 GMT
That is looking mighty fine Joe  |
|
|
|
Post by Snipersmudge on Feb 10, 2020 18:38:31 GMT
That really is a thing of beauty! |
|
|
|
Post by Robbo on Feb 10, 2020 19:34:34 GMT
I know I haven't been on the site too much lately but how did I not see this cracking build
|
|
|
|
Post by dukemaddog on Feb 10, 2020 22:30:48 GMT
Spectacular work Porco! Way to go man; you are really bringing this to life. Brilliant idea with the bent brush.
|
|
|
|
Post by PorcoRosso on Feb 14, 2020 13:02:27 GMT
|
|
|
|
Post by Paul B on Feb 14, 2020 15:46:56 GMT
This is just getting awesomer by the minute  |
|
|
|
Post by Snipersmudge on Feb 14, 2020 17:27:06 GMT
Smart masking & smart work Joe looks really great |
|
|
|
Post by PorcoRosso on Feb 14, 2020 18:24:20 GMT
Cheers Paul. . Thanks Pete. The only reason I have to mask everything is because I'm never happy with the finish I get when I use a hairy stick.  I glued the turbochargers in place.  |
|
|
|
Post by dukemaddog on Feb 14, 2020 19:01:28 GMT
Wow, I've seen so many of these built up; this is the first time I've gotten to watch one being assembled. You are doing a magnificent job!
|
|
|
|
Post by Paul B on Feb 14, 2020 19:39:59 GMT
 This is madness, I can't see any joins anywhere. |
|
|
|
Post by Armorguy on Feb 14, 2020 19:59:53 GMT
Paul's right, this looks damn nice.
|
|
|
|
Post by Boots on Feb 15, 2020 14:59:58 GMT
Pure eye candy  |
|
|
|
Post by Ian H. on Feb 15, 2020 19:20:01 GMT
Great looking P-38! Yes, I heard the fit on this kit is just amazing and you really can build and paint in sub-assemblies.
Regards,
Ian
|
|
|
|
Post by PorcoRosso on Feb 16, 2020 7:22:44 GMT
Thanks gents. Duke, Paul, Armorguy, Boots, and Ian. Thanks again. Paul, As Eric would have said to Ernie, "You can't see the join" Here's another sub-assembly. This photo shows one of the main undercarriage bays. The yellow filter on the intake duct is made of Tamiya masking tape. I just cut it out with a hole punch, and put it in place. The doors are well detailed, and easy to fit. Two are in position as they would be on the finished model, and the other pair show the large tabs which locate them, and hold them in place. Although you can't see it, every tab has a number moulded on it, so it's impossible to get them in the wrong place. The round ring section at the front, is where one of the three weights locate. There is one in each boom, and one in the nose. Each ball weighs 10grams and is 13.5mm in diameter. 
|
|


 .
. .
.


