|
|
Post by Armorguy on Feb 16, 2020 8:53:30 GMT
The metal colour looks great, what brand is it chap ?
|
|
|
|
Post by PorcoRosso on Feb 16, 2020 9:04:15 GMT
The metal colour looks great, what brand is it chap ? It's a Tamiya rattle can. Bare metal silver AS-12. It gives a very nice finish straight from the can. |
|
|
|
Post by Snipersmudge on Feb 16, 2020 14:46:43 GMT
really nice work  |
|
|
|
Post by Boots on Feb 16, 2020 16:27:42 GMT
Puttin` on a great show here fella......looks awesome  |
|
|
|
Post by PorcoRosso on Feb 18, 2020 9:45:53 GMT
Cheers Pete and Boots.  With the fuselage finished, I've made a start on the booms. Because there is a seam line running up the centre of the booms, I'm going to try painting the booms fully before joining them together. Hopefully I'll only have small sections of the seams to deal with when it comes to touching up. This will also save me masking the undercarriage bays and breaking off the undercarriage and door parts that stick out when doing so. Some of the parts stuck to a tape board for spraying. 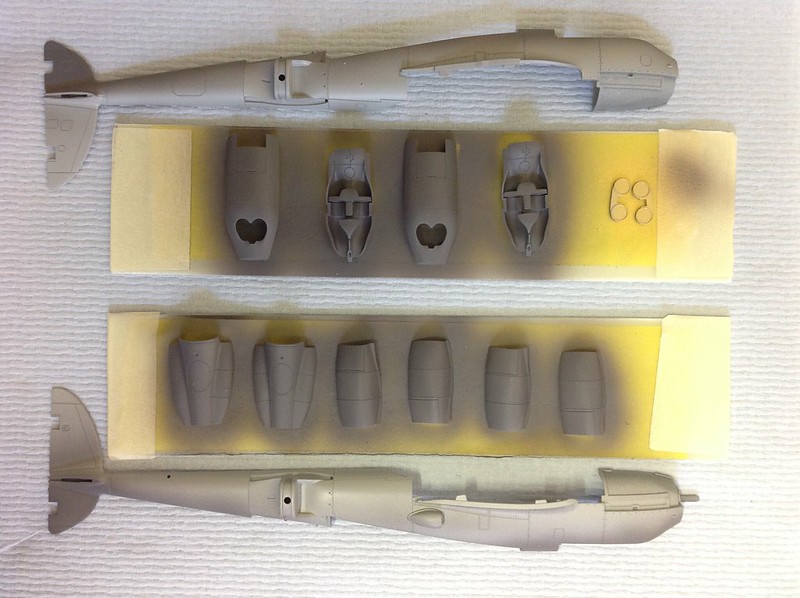
|
|
Mence
Plastic connoissuer

Posts: 1,575
Mini profile background: {"image":"","color":"Ee09b9"}
|
Post by Mence on Feb 18, 2020 10:12:49 GMT
Super clean build, she's a peach.
|
|
|
|
Post by Snipersmudge on Feb 18, 2020 17:51:28 GMT
Yes indeed shaping up to be a stunner |
|
|
|
Post by Boots on Feb 18, 2020 19:16:34 GMT
That does look sweet as Joe  |
|
|
|
Post by Paul B on Feb 19, 2020 4:54:58 GMT
Awesome as fella  |
|
CeeBee
Sprue Cutter  I'm Still breathing...............Man is THAT a Bonus...
Posts: 437
|
Post by CeeBee on Feb 19, 2020 19:46:38 GMT
This is a great kit,and a great build so far!!! I've near on finished the build on mine,but I'm looking around for decs to do a NMF version if possible.
|
|
|
|
Post by PorcoRosso on Mar 1, 2020 7:30:54 GMT
Thank you Mence, Pete, Boots, Paul, and CeeBee. This kit just falls together, the fit is that good. Sorry for the lack of updates. I've made a little progress in the last few days. I glued the boom halves together gluing from the inside as much as possible. There was only one area that needs a bit of attention, that's on the underneath, forward of the undercarriage bay. I made a homemade sanding stick the correct width (see photo), and gave the seam a quick rub over. In the photo this shows as the white line which will need a quick blow over. 
|
|
|
|
Post by Paul B on Mar 1, 2020 7:45:22 GMT
Awesome Joe . Well spotted and fixed too on that mini flaw |
|
|
|
Post by SteveM on Mar 1, 2020 8:45:54 GMT
Super thread and build fella! This kit is on my list  |
|
|
|
Post by Armorguy on Mar 1, 2020 11:31:42 GMT
I'm not a wingie builder but this thread makes me want to start one.
|
|
|
|
Post by Boots on Mar 1, 2020 12:36:21 GMT
Bootiful work there Joe |
|
|
|
Post by Snipersmudge on Mar 1, 2020 18:32:55 GMT
Lovely and clean Joe, looks superb |
|
|
|
Post by PorcoRosso on Mar 3, 2020 14:53:27 GMT
Cheers Paul, Steve, Armorguy, Boots and, Pete. Much appreciated. Had time to cut out and fit the mask supplied with the kit today. Never used these before, but the fit is very good. 
|
|
|
|
Post by Paul B on Mar 3, 2020 15:12:51 GMT
Very nicely masked Joe . I usually make my own masks for glazing, and after they are applied I'll give them a light coat of gloss. This is to be sure there's no bleeding under them when the colour goes down |
|
|
|
Post by PorcoRosso on Mar 3, 2020 17:16:25 GMT
Very nicely masked Joe . I usually make my own masks for glazing, and after they are applied I'll give them a light coat of gloss. This is to be sure there's no bleeding under them when the colour goes down Thank you Paul. Thanks also for that top tip, I'll give it a go. |
|
|
|
Post by Snipersmudge on Mar 3, 2020 18:09:59 GMT
Neat bit of masking old chap |
|


