|
|
Post by PorcoRosso on May 3, 2021 10:39:56 GMT
Hi gentlemen. I'm thinking it's about time for another wingy thing from me, so I thought I'd have a bash at a Zvezda C-130 Hercules in RAF markings. I remember the first time I saw a Herc. There were a pair of RAF Hercules flying low, in their Gloss Dark Earth, Light Stone and, Black camouflage finish as we walked along the coast at Lulworth Cove in Dorset. We were on a school trip at the time. It was in the summer of 1970 as that was my last full year at school, the following year I had to start work. It was also about this time I believe the Airfix kit was released in the same camouflage scheme. I intend to build my Zvezda Herc in the same colour scheme I saw that day using the markings from a 26 Decals set. At the bottom I've posted a picture of the Airfix Hercules box art so you young'uns can see it in all it's glory! This old kit also included a Land Rover and a Bloodhound missile, which you can see in the photo taken from the 1969 Airfix catalogue. You will notice in the bottom right hand corner of said photo the pre-decimalisation princely sum of 21 shillings & 6 pence! Or, One pound, seven and a half pence in today's coin of the realm. For it's day, it was a great kit. It did have a few fault's, but because there was no internet, the majority of modellers were totally ignorant of the fact and loved the kit for what it was, a fantastic new kit! Over 50 years later, and there is a new Herc on the block. As you would expect, there is a lot more detail, but Airfix still has the best box art! I hope I can do it justice.  Zvezda box art.  Box contents.  The 26 Decals. 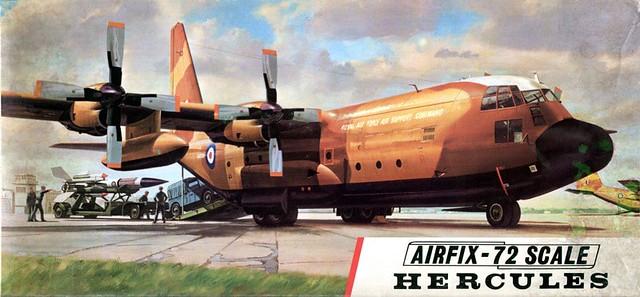 The magnificent Airfix box art.  A page from the 7th edition of the Airfix Catalogue showing their Hercules. Take a moment to read how Airfix described their kits. For example, things like, movable under-wing bomb carriages, R.A.F. tractor and bombs included, retractable undercarriage and, this giant kit! No wonder young lads like me couldn't resist spending all our paper round money on them. Enough of my trip down memory lane, it's the Zvezda Hercules I'm building. Not sure how long it will take me, but I'll make a start before the end of the week. |
|
|
|
Post by Paul B on May 3, 2021 10:53:53 GMT
Looking forward to this Joe  |
|
|
|
Post by tommygunn on May 3, 2021 12:31:22 GMT
Thanks for taking us down your memory lane. I had a nice walk.
|
|
|
|
Post by SteveM on May 3, 2021 16:03:37 GMT
Hot digity dog! This is the Herc kit I would go for, both the Zvezda kit and the camo Did I say I was in? |
|
|
|
Post by Marco on May 3, 2021 16:53:15 GMT
Ok, Zvezda... I don't know if Paul hate MiniArt kits more than I hate Zvezda kits. But in your hands, and painted like the pics you show us, will be stunning! I'm in!
|
|
|
|
Post by Paul B on May 3, 2021 16:55:44 GMT
Ok, Zvezda... I don't know if Paul hate MiniArt kits more than I hate Zvezda kits. But in your hands, and painted like the pics you show us, will be stunning! I'm in! Zvezda are defo better.... sometimes.... more than sometimes now  |
|
|
|
Post by Armorguy on May 3, 2021 18:21:05 GMT
Hooked.
|
|
|
|
Post by PorcoRosso on May 3, 2021 19:33:50 GMT
Thank you gentleman. I hope the 50 year old Airfix kit isn't a better option. We shall find out as this progresses.
I think a tape together job is called for to get a general idea of the fit. 🤞
|
|
|
|
Post by Ian H. on May 3, 2021 22:48:07 GMT
Can't wait to see this Herky Bird formulate! Popcorn and Scotch are ready.
|
|
|
|
Post by SteveM on May 4, 2021 7:04:05 GMT
Thank you gentleman. I hope the 50 year old Airfix kit isn't a better option. We shall find out as this progresses. I think a tape together job is called for to get a general idea of the fit. 🤞 There’s a build on YouTube that seems to show this going together quite well so I think you’ll be fine buddy |
|
|
|
Post by Ian H. on May 4, 2021 15:24:00 GMT
Brings back great memories. North Carolina ANG used to fly -130s in the 80's and every weekend they would shoot touch and go's at our local airport. Dad would drive me up there in his VW Bug convertible and we would watch them, up close, all day. Magnificent airplane.
|
|
|
|
Post by Snipersmudge on May 4, 2021 16:05:07 GMT
In the hands of the master this is gonna be good!
|
|
|
|
Post by PorcoRosso on May 4, 2021 18:04:35 GMT
Thank you very much for your encouragement gentleman. I daren't elbow it now, even if it turns out to be a bag of knob!  |
|
|
|
Post by PorcoRosso on May 6, 2021 19:05:28 GMT
The main structure goes together nicely with the help of a bit of tape. I've seen that some modellers tape their kits together like this, then leave them for a few weeks to take the stress out of the plastic. I don't know if this works, but I can understand why they do it. This was referred to as annealing when I worked with transparencies. For example, a Hawk canopy would be annealed during construction. It would be clipped in place in the build jig, placed in the oven, and annealed for a set number of hours and a set temperature to remove the stresses that had built up during manufacturing. I'm not suggesting that anyone should bung their model in the oven next to their jacket potatoes, but it did make me wonder if you left the model taped up and left in the window on a sunny day, would it have the same affect? I think I'll leave it taped up while I'm getting the bulkheads underway. The plastic is a bit harder than Tamiya, but trims nicely, and has very fine panel lines. One thing I did notice, the tape lifted on some areas. I'm sure it's just release agent on the moulding. I don't normally, but I will rinse the plastic off with soap and water before painting. It's a big beast with a 22 inch wingspan, and 16 inches long. I intend to put some lugs along the length of the fuselage to help marry up the two halves. The bulkhead positions will have to be marked first, so the lugs don't foul them when the bulkheads are fitted. The main structure goes together nicely with the help of a bit of tape. I've seen that some modellers tape their kits together like this, then leave them for a few weeks to take the stress out of the plastic. I don't know if this works, but I can understand why they do it. This was referred to as annealing when I worked with transparencies. For example, a Hawk canopy would be annealed during construction. It would be clipped in place in the build jig, placed in the oven, and annealed for a set number of hours and a set temperature to remove the stresses that had built up during manufacturing. I'm not suggesting that anyone should bung their model in the oven next to their Sunday roast, but it did make me wonder if you left the model taped up and left in the window on a sunny day, would it have the same affect? I think I'll leave it taped up while I'm getting the bulkheads underway. The plastic is a bit harder than Tamiya, but trims nicely, and has very fine panel lines. One thing I did notice, the tape lifted on some areas. I'm sure it's just release agent on the moulding. I don't normally, but I will rinse the plastic off with soap and water before painting. It's a big beast with a 22 inch wingspan, and 16 inches long. I intend to put some lugs along the length of the fuselage to help marry up the two halves. The bulkhead positions will have to be marked first, so the lugs don't foul them when the bulkheads are fitted.  |
|
|
|
Post by Marco on May 6, 2021 19:55:04 GMT
It's looking great already! |
|
|
|
Post by Boots on May 6, 2021 20:57:22 GMT
I do like these big transporter birds..........nice start Joe and may the de-stressing gods be with you |
|
|
|
Post by Ian H. on May 6, 2021 23:45:40 GMT
Joe, looking good in the test fit phase!
|
|
|
|
Post by tommygunn on May 7, 2021 10:43:37 GMT
I definitely wouldn’t have the patience to leave a kit for a couple of weeks. Maybe a day on a sunny windowsill would be might limit.
|
|
|
|
Post by PorcoRosso on May 8, 2021 18:09:33 GMT
Marco, Boots, Ian & Tommy. Cheers chaps. Tommy, the speed you go, it would be done in a couple of weeks. I've made a start with the cockpit assembly. The first job will be to give them a coat of primer, then the two different top coats. I'm not sure of the early RAF cockpit colours yet (most of which won't be seen). I've seen a few variations, so it's going to be a bit hit or miss. The lower half looks like a pale green, with a cream or light grey upper section. I can also paint the cargo deck at the same time. I'll paint anti -slip sections to represent the floor covering. The kit comes with three crew figures. As a lad, I always included them. I don't know if I will this time, but they are rather nice and it would save me fitting seat harnesses. I've also started putting lugs along the fuselage. I would do this a lot during my vacform fetish. It lines long seams up nicely, and strengthens the joint. I don't think it's really necessary on this kit, but it won't hurt. I used 1mm stock card for the section that can be seen. I'll use a thinner gauge on the fuselage body as it has a curve and the 1mm card might be too strong and not bend to the shape of the fuselage. The main wing comes in five parts. I glued the center section to the lower section of the wing as I might put a stiffener in to strengthen the upper wing butt joint a little.     |
|
|
|
Post by Boots on May 8, 2021 18:35:54 GMT
Great work Joe and a good idea with those re-inforcement lugs........i`ve done similar before on long runs etc and i find it makes a great seating point for the two halves  |
|


