|
|
Post by Paul B on Jan 2, 2021 22:44:51 GMT
You can say that again. These are two different vehicles, one hit on the windscreen the other went through
the engine block.
|
|
|
|
Post by Ian H. on Jan 3, 2021 3:41:35 GMT
Oh damn!!!!!!! That windshield shot is nasty.
|
|
|
|
Post by Snipersmudge on Jan 3, 2021 6:40:58 GMT
Ah yes I remember Brian showing me those pictures, Good start as well mate.
|
|
|
|
Post by SteveM on Jan 3, 2021 9:36:12 GMT
This will be good.. and a great way of using up a challenging kit!  |
|
|
|
Post by PorcoRosso on Jan 3, 2021 10:53:17 GMT
This will look like a wreck when you've finished it. |
|
|
|
Post by tommygunn on Jan 3, 2021 12:46:30 GMT
So, what’s the story behind the pics? When did this happen?
Gympys - not heard that word in many a year.
|
|
wouter
Plastic connoissuer

Posts: 1,323
|
Post by wouter on Jan 3, 2021 12:59:38 GMT
wow, that's a seriously bad looking interior after that hit  . Looking forward how this mess unfolds |
|
|
|
Post by Marco on Jan 4, 2021 12:48:09 GMT
Great challenge. I know that you will finish it in a fantastic way!
|
|
|
|
Post by Paul B on Jan 17, 2021 18:00:30 GMT
Chaps thank you kindly for your comments  . Tommy the conflict was this one  : en.wikipedia.org/wiki/1981_Entumbane_uprisingOkay it's time to get serious with this monster of a kit now . The floor of the fighting compartment was wrong, Skif added indents instead raised strengthening bars, these I filled with rod and gave a good smear of Mr Surfacer 500. The side MG ports are square on the inside, but Skif didn't add anything at all, these were made from square rod chopped off in 0.5mm lengths. Also the handles for opening the ports have been added. I then decided to blow the fuel tanks up . This being a petrol engined vehicle, I think when the shrapnel from the 90 mil hit they would have exploded and caught fire. I used the kit tanks, but went to work on them with my new power tool from the out and insides  . Once thin enough, I pushed the plastic from the inside upwards, to make it look like it had gone bang . I also added the pipe from the filler cap which also doesn't exist in the kit. Enuff talk, here's the pics  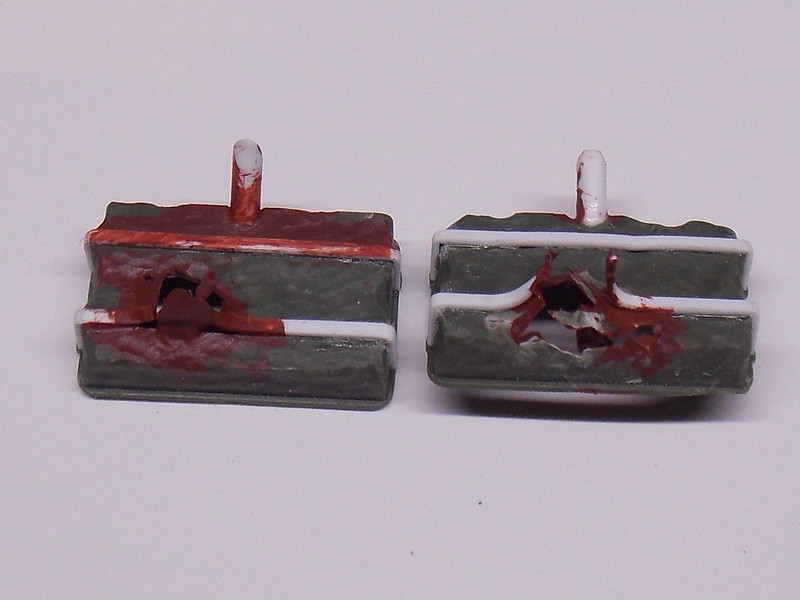   More soon dudes |
|
|
|
Post by Armorguy on Jan 17, 2021 18:29:29 GMT
They certainly did go bang Paul, grand execution fella. You've been using the Dremel?
|
|
|
|
Post by Paul B on Jan 17, 2021 18:33:04 GMT
Cheers Guy, and yes my new cheapo tool from Lidl |
|
Si B
Plastic Connoisseur
Posts: 1,455
|
Post by Si B on Jan 17, 2021 18:42:43 GMT
Nice start on the build or should I say destruction o.O !! Not seen this vehicle before and it’s not a bad looking bit of kit....look forward to seeing you blow it up   |
|
|
|
Post by Paul B on Jan 17, 2021 18:48:39 GMT
Cheers indeed Si . If you want a good kit, there is now a version of this from Trumpeter |
|
|
|
Post by Boots on Jan 17, 2021 19:00:45 GMT
Top work mucker......nicely savaged indeed  |
|
|
|
Post by Paul B on Jan 17, 2021 19:13:55 GMT
Cheers Boots mucker , that is what we're after in this group build |
|
|
|
Post by Boots on Jan 17, 2021 19:24:33 GMT
Absolutely.........`pure savagery `  |
|
|
|
Post by Ian H. on Jan 17, 2021 21:00:29 GMT
Paul, great construction...er, I mean destruction. And don't worry, power tools are a normal accessory for a Skif kit. Kind of like the time I had to use DeWalt power tools to build a Czechmaster F3D Skyknight.🤣🤣🤣
|
|
|
|
Post by Paul B on Jan 18, 2021 5:02:20 GMT
Cheers Ian . Power tools are good for these little monsters, I reckon it'll get its moneys worth on this build |
|
|
|
Post by Snipersmudge on Jan 18, 2021 6:08:14 GMT
Very nice bit of damage mate, looking good.
|
|
|
|
Post by tommygunn on Jan 18, 2021 12:07:21 GMT
I could do with those tools to wreck my ZAKU.
Great work so far can’t wait to see what’s coming next.
Thanks for the link to the background story.
|
|


 . Looking forward how this mess unfolds
 .
. :
:


